
A Healthy Spine: Strength Through Curves
One of the most interesting structures in nature is the human spinal column. When the spine is aligned, the unremitting force of gravity flows easily through it. If the spinal curves are habitually disturbed, gravity becomes the enemy. As a result, tension builds up around the spinal column as the body attempts to hold itself upright by overusing muscles and ligaments. Since these structures were not intended exclusively for this use, the soft tissues of the back tire. This can lead to muscle spasms or generalized fatigue. One of the best ways to reduce stress is to stand so that the natural curves of the spine are maintained. In this article we will practice ways to do just that.
One of the most interesting structures in nature is the human spinal column. When the spine is aligned, the unremitting force of gravity flows easily through it.
Commonly known as the backbone, the spinal column consists of thirty-two bones called vertebrae. They are arranged in a series of four gentle curves: cervical (neck), thoracic (middle back), lumbar (lower back), and sacrococcygeal (pelvis). In order to bear weight successfully, these curves should be neither increased nor decreased too much.

Most of the vertebrae are separated by intervertebral discs (pads of fibrocartilage). All are connected by ligaments (bands of connective tissue) and muscles that enable us to twist and bend forward, backward, and sideways. In between the vertebrae are the exit points for the spinal nerves which branch from the spinal cord itself. The spinal cord passes through the middle of the spinal column, ending at the level of the first lumbar vertebra.
For some hands-on information about the spine, stand sideways near a full-length mirror. The spine begins at the base of the skull and ends at the tailbone. Begin by running your fingertips from the base of your skull gently down the back of your neck. Feel how your neck curves toward the front of your body. This is called the cervical spine and consists of seven vertebrae.
The next region of the spine is called the thoracic spine. Look in the mirror and notice how your upper back curves away from your body in exactly the opposite direction from your neck. There are twelve thoracic vertebrae, each with two ribs attached.
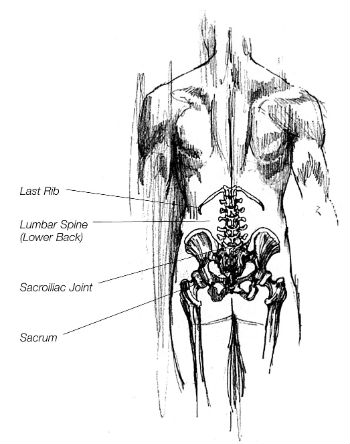
Below the thoracic region is the lumbar spine or lower back. It extends from the last rib in the back to the top of the sacrum. The lumbar spine has five vertebrae and, like the cervical vertebrae at the top of the spine, curves inward. Place your fingers at the back of your waist and feel this gentle curve.
Let your fingers continue down the back until you locate the sacrum, a triangular-shaped bone which curves outward like the thoracic spine. Unique in composition, the sacrum consists of five vertebrae that fused together during the normal course of development. Below the sacrum are three small bones which make up the coccyx or tailbone. They are inconsequential to most spinal movements.
Standing Well: Mountain Pose
In yoga, standing in the position of postural awareness is called mountain pose. When this pose is practiced well, the body is prepared for almost all daily movement: standing, sitting, walking, and running. Like the mountain poised between heaven and earth, this pose establishes a foundation through the legs and feet and encourages the lift of the spine.
Setting Up Stand sideways near a full-length mirror so you can check your alignment. Alternatively, practice with a friend who can tell you how you are doing. If you find yourself without these props, practice anyway. The more you practice, the more you will develop an internal sense of your own alignment.
We will begin with the foundation: your feet. Attention to the details of placing the feet is important. Stand with your feet hip-width apart. For most people this is about six to ten inches. The center line of the foot should point forward. If you are not sure what this means, look down and imagine that each foot is placed on a line drawn from a point between your second and third toes through the center of the front of your ankle and continuing to the center of your heel.
Attention to the details of placing the feet is important.
Standing with your feet parallel can help to maintain the normal spinal curves and a balanced position of the pelvis. Standing with the feet turned out causes the back of the pelvis to drop and flattens the lumbar curve. Standing with the feet turned in tilts the top of the pelvis forward, increases the lumbar curve, and stresses the inner knees.
After you have positioned your feet, place your hands on the rim of your pelvis. If you are not sure where this is, put your hands at the sides of your waist and slowly move them down until you feel a bony ridge. This is the rim of the pelvis.
With your hands on the pelvic rim, feel if the pelvis is in a balanced position. If you have pushed the pelvis backward, you flatten the lumbar curve, decrease the ability of the lumbar spine to bear weight successfully, and increase strain on the soft tissues in the area. To correct this misalignment, adjust the pelvis so that it sits exactly over the tops of the thighs.
Correct alignment may feel strange at first, so check yourself in the mirror again or ask your friend for feedback. Looking at you from the side, your friend should be able to draw an imaginary vertical line from your ear to your shoulder joint and down through the center of your hip, knee, and ankle. Once you have found a good position for the pelvis, let your arms drop to your sides.
Do not hyperextend your knees. Commonly called “locking the knees,” hyperextension is a condition in which one hangs backward on the internal knee ligaments. This habitual posture overstretches these ligaments and leads to instability in the knee joints. If you stand this way, bend your knees slightly to avoid pushing back. Check in the mirror to make sure that your lower legs are vertical.
Now bring your attention to your head and neck. If the body is aligned, usually the head follows. But take a moment to check it anyway. This is harder to do by yourself, so ask a friend for feedback. If you are practicing on your own, here are two ways you can check the position of your head and neck.
First, your eyes should be level with the horizon. If you are looking up or down, even slightly, your head is tipped and your neck will not be in a neutral position. Remember, in its neutral position the cervical spine has a slight inward curve.
Second, place your fingers at the base of your skull to help you feel the position of the back of your skull in relationship to your neck. Is the skull moving down toward the neck? If you are not sure, then exaggerate the movement. Notice how your chin juts forward and you feel increased tension in the muscles of the back of your neck. Bring your head back to the point where the skull lifts away from the neck and the chin is parallel to the floor. As you do this, feel the neck muscles soften.
Being There Once you are in alignment, notice your physical sensations. Is your weight balanced evenly between your feet? Between the front and back of your feet? Your legs should feel active, but not tight. Is there any tension in your shoulders? Drop them away from your ears and allow your arms to feel long and relaxed at your sides.
Once you are in alignment, notice your physical sensations. Is your weight balanced evenly between your feet?
Feel a lightness in your spinal column and the exhilaration from the upward movement of the spine. Allow your head to be balanced on your torso.
Feel minimum effort and maximum comfort in breathing. Breathe several long, smooth breaths and relax, still maintaining awareness of your alignment.
Benefits
Practice mountain pose several times a day. Standing well reduces strain on the joints, ligaments, and muscles, especially on those of the spinal column and lower extremities. It also aids respiration, digestion, and elimination. It gives the practitioner confidence, and conveys a sense of poise and self-esteem.
Cautions
Remove your socks for this pose.
If you have low blood pressure, do not practice mountain pose for more than two minutes.