How to Drop Back into Urdhva Dhanurasana from Standing
I remember the first time I ever dropped back into an urdhva dhanurasana (upward bow pose, sometimes called wheel pose). It was in ninth grade gym class, and we were having a "free day." At my school, "free day" typically meant that the boys got to play basketball and the girls got to walk aimlessly in circles around the gym for 45 minutes. As a 14-year-old with excess energy and a short attention span, I wasn't so into pacing the hardwood for the entire class period (even if it meant simultaneously engaging in deep philosophical debates with my friends, including, but not limited to, "who is the most attractive member of NSYNC?" and "What smells better, CK1 or Tommy Girl?"), so I would entertain myself by stopping to attempt gymnastics skills (with varying amount of success). On that particular morning, tired of contesting the merits of Justin over JC, I stopped to ponder: "Hmmm, I wonder if I could just drop into a backbend right here?" And it turns out I could. (And thank God! I mean, those gymnasium floors are pretty hard. Yikes!)
Pretty soon, dropping back (and occasionally kicking over) became my favorite "trick," but like so many teenage infatuations do, once I left for college it fell by the wayside. Daily yoga classes replaced impromptu tumbling sessions, and while I continued to backbend, it was always from the ground up.
That is, until the first time my yoga teacher said "Today we're doing dropbacks!" which she quickly defined as "dropping back into wheel pose from standing."
"Hey, I can do that!" I thought. But then I tried. And wow. The floor seemed a lot further away than I remembered. And a lot harder. And my whole body seemed a lot stiffer. And I couldn't bend my knees. And then the fear response kicked in: What am I doing?! Stop! Abort mission!
I did not do a dropback that day. And I was pretty sure that I'd never do one again. "How was I ever that fearless?" I wondered. A little older, a little taller, and a little wiser, I reasoned that I should probably let dropping back remain safely tucked away in the realm of high school nostalgia, right there with my low-rise jeans, hair mascara, "Free Winona" tee, and Dawson's Creek fan-fiction.
But the option to drop back kept popping up: In class. In teacher trainings. In hands-on-assist workshops. And while I knew that dropping into urdhva wasn't some major life-changing event, that it wouldn't magically make me a better student or teacher (or person), dammit, it looked like fun! And I remembered how fun it used to be. But, I (eventually) realized that if I wanted to do a dropback again, I would have to start approaching it like a grown-up. My adult brain and body would no longer let me drop everything and fall right back into a backbend (probably a good thing). This was something I had to slowly work toward. Something that would take time and effort. My teachers had given me the tools to prepare for dropbacks—knowledge about sequencing and alignment, preparatory poses and drills, info about working with props—but it was up to me to actually put those preparations into practice.
This was something I had to slowly work toward. Something that would take time and effort.
Below is a sequence that includes some of the poses, preps, and props that helped make dropbacks less scary and more accessible for me (and later, many of my students). If dropping back is a transition that you're working toward (or helping some of your students work toward), you might find them helpful too.
Centering and Warm-Up
Before you jump right into the asana, take a few minutes to center and settle into your breath. If I know I'm going to be sequencing toward dropbacks, I like to start with a nice, luxurious supported backbend (like, say, draping myself over a bolster, rolled blanket, or a few yoga blocks) while I attune to my breath (allowing it to become smooth, even, continuous, deep, rich, and full) and enjoy some nice, passive chest-opening. (If you're like me and backbends aren't exactly your favorite category of poses, this can serve as a nice reminder that "hey...these aren't so bad after all!")
Once you've taken some time to breathe and be, do a few of your favorite warm- ups and some surya namaskar (sun salute) variations, paying special attention to grounding through your legs and feet (this focus will come in especially handy when you're dropping back!)
Get into Your Legs!
As I may have mentioned earlier, for a lot of people (*raises hand*), dropping back can be a little scary, especially in the beginning. That's why before you get right into the backbending, it's important to get grounded. If you feel strong in your legs and steady in your foundation, it can help those big, expansive "heart-openers" to seem more doable and dropping back into them to seem less frightening. Plus working from the ground up in this way sets you up for a more sustainable backbend in the long run.
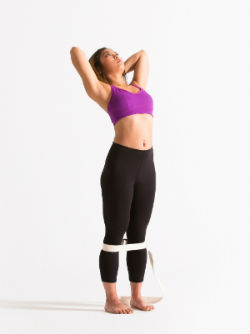
Tadasana (Mountain Pose) with Strap-Wrap (or, "Hulk-Asana")
Make a loop with a yoga strap that's big enough to wrap around your shins, yet tight enough that you can push out against it and feel some resistance (you may need to experiment a bit until you find the perfect-sized loop for you). Be sure to wrap the strap below—not on or above—your knees). Parallel your feet, micro-bend your knees (just a tiny bit to avoid locking), and press your feet apart from each other. Try to bust your strap open—like the Incredible Hulk would if, you know, he had a yoga strap wrapped around his shins. (Unless you were exposed to massive amounts of gamma radiation resulting in Hulk-like super-strength*, you most likely won't break the strap, but you'll probably feel the engagement in your abductors—your outer hips—specifically gluteus medius and minimus.) Keep your low belly active, and if you notice your low ribs jutting forward, gently draw them back.

Why this is awesome: Engaging in this way (pushing out into the strap) supports the natural curve in your lower back, bringing the top of the sacrum in (an action called sacral nutation) which sets the stage for safe, healthy backbends! Along with thigh stretches (more on those later), this is honestly what helped coax me over to "team backbend." See, for the longest time, I used to squeeze a block between my thighs in backbends—and I'm not saying this is a bad idea, block-squeezing can for sure be a godsend for some people, but it wasn't serving me, and it wasn't serving a lot of my students either. Here's why: For a lot of us, when we block-squeeze, we end up scooping the tailbone forward (tucking) and—for backbends especially—tail-tucking is not super-great, because it can erase the natural curve of the lower back. (To delve more into why tail-tucking isn't optimal for backbends, check out Doug Keller's "5 Steps to Safer Backbends.")
When you push into the strap, on the other hand, it supports the curve instead of erasing it.
From here, keep pressing down and apart, stretch arms up to the sky and enjoy a few side bends!

Then, bend your knees, sit low, and bring your fingertips to the floor (or blocks) next to your heels. Stay low, keep pushing out against the strap, and lift your low belly away from your thighs. Keep those actions and rise up into utkatasana (chair pose).

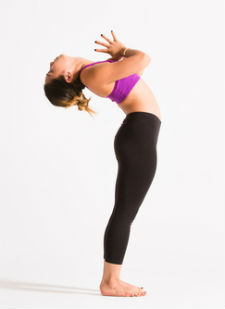
Lead with Your Chest and Let Your Head Follow (a.k.a. "Backbend Over a Barrel")
Knowing what the heck to do with your head is pretty important when it comes to backbends; it can make the difference between the backbend feeling great and, well, not so great.
First let's explore head alignment in a non-backbending posture:
Ardha Parshvakonasana (Half Side Angle Pose)
Even if you normally practice with your bottom fingertips on the floor or a block, just for now bring your bottom forearm onto your thigh. Spin your bottom palm up and press the forearm down to lift up out of your shoulder joint (instead of collapsing into it).
Then, bring your left (top) hand behind your head—thumb and index finger right around the base of your skull. Bring your top elbow point straight forward (to the wall in front of you, not the ceiling). Simultaneously "suck" your elbow back toward your armpit (this will help to stabilize your shoulder), and gently press your head against your hand (you're not lifting your chin up or dipping it down, but pressing straight back like you were moving into a headrest).

Now, use your hand (the one behind your head) for traction as your lengthen the back of your neck. Keep that support, and spin your chest up toward the ceiling. Then, if it feels okay for your neck, use your hand to help you turn your head (not just your chin) to look up. (This is the key here! Your chest leads the way—not your chin—and your head follows). Now you can extend your top arm alongside your ear and/or bring your bottom fingertips to the floor or a block if you like.


Stay for a few breaths, and press your feet down and apart from each other to rise up. Repeat on the other side.
Bhujangasana (Cobra Pose)
There are two super-common mistakes that we yogis often make in backbends. The first is leading with the chin, and the second is not moving the head at all in order to avoid leading with the chin. As is so often the case, the sweet spot lies somewhere in the middle, and like with the parshvakonasana variation above, the key is to lead with the chest and let the head follow. Let's explore this in bhujangasana.
Lie on your belly. Stretch back through your big toes so that your feet point straight back, and press all of your toenails—especially your pinky toenails—into the floor. Engage your deep low belly by narrowing your two frontal hip bones toward each other, then lift the skin of your pubic bone toward your navel so that your pelvis rests lightly on the floor (avoid pressing or pushing the pelvis into the floor). Bend your elbows and place your palms on the floor so that your elbows are stacked over your wrist creases. Bow your head slightly and look toward the floor. Lift the fronts of your shoulders away from the floor.
The key here too is to lead with your chest, not your chin coming into the pose: Keep your head bowing forward, and on an inhale, lift your chest to move into the backbend. Broaden your collarbones, lift your sternum, then let your head follow the lift of your chest, moving the back of your head back. (Moving from the back of the head here as opposed to the chin will help you keep the back of the neck long as you open your throat and move into your expression of the backbend.) Everything moves at the same speed here: chest lifts, back of the head moves back to follow.

Putting It All Together
Standing Backbend with Strap
Practice coupling the stability in the legs with your backbend as you once again wrap your strap around your shins, parallel your feet, micro-bend your knees, and press out against the strap, engaging your abductors, and setting the stage for a fabulous backbend!
Keep pressing your shins against the strap, and interlace your hands behind your head. Instead of pointing your elbows out to the sides, bring them in slightly—not so much that you're squeezing the sides of your head, but so that they're pointing out at 45-degree angles. Simultaneously "suck" your elbows back toward your armpits and gently press the back of your head into your hands; use your hands for traction as you lengthen the back of your neck, then lift your chest up and move the back of your head back to follow.
Keep the engagement in your legs (shins against strap) as you continue to lift your low belly, broaden your collarbones and lift your chest, and move the back of your head back. (You might find it helpful to imagine that you're backbending over a big barrel here. Or, if you took gymnastics as a little kid, you might recall backbending over the octagon mat; it's sort of like that, only you remain standing upright. For now anyway.)
Next, bring one hand to your lower back, just below your rib cage. Keep pressing into the strap, lift your low belly, lift your chest, and move the back of your head back; now you're backbending over your hand! If you need the hand behind your head to feel stable, keep it there. Otherwise, bring the hand behind your head to your low belly. Press into the strap, lift your belly, lift your chest, and continue to backbend. You might even stretch your arms alongside your ears here.

Stay for a few breaths, press against the strap, and lead with your chest (not your chin!) to come up. Head comes up last.
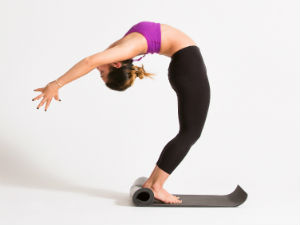
Don't Forget the Quad Stretches!
For a long time, I really disliked backbends, not so much because my upper body was inflexible, but because my quadriceps felt super-tight, which would restrict my movement and make these poses rather unpleasant. It wasn't until I attended a sequencing workshop which stressed the importance of "thigh stretches" (specifically quad stretches) that my backbend-dread began to subside. There are lots of ways to stretch your quads—ardha bhekasana (half frog pose), pigeon with a thigh stretch, and "baby dancer pose" (a standing quad stretch), for example—and I would suggest incorporating at least a couple of these into a sequence leading up to dropbacks (or any urdhva dhanurasana variations really).
A lunge avec quad stretch is one I especially like. Here's a twisted version to try:
From your regular lunge, walk your hands to the inside of your right (front) foot, and lower your back knee to the floor. (You may want to walk your right foot over to the right a bit as well.) Turn your right toes out to face the upper right corner of your mat (this can help to keep your front knee from dropping in). Press fingertips into the floor and see if you notice a corresponding engagement in your low belly. Keep that engagement, and walk your right hand up onto your right thigh. Lengthen through your spine, and twist your belly to the right. Then draw your left (back) heel in toward your seat. Initiate this movement by (slightly) squeezing your left hamstrings and the left side of your butt. Catch the pinky-toe side of your left foot with your right hand (holding the pinky-toe side as opposed to the big-toe side will help to prevent your shoulder from rolling forward). Keep your toes active, and bend your right elbow to help you draw your heel in. The tendency here is often to roll to the inside of the back knee, so rolling a little more onto the outside can help to counter this. You can keep your left fingertips on the floor, or lower to your palm or forearm if that feels good.
Find a little more length in your spine with each inhale (even backing off the twist slightly) and a little more twist with each exhale. You can even find a little sense of a backbend here as you broaden and lift your chest, lean back, and enjoy! On an inhale, release your back foot without "slingshotting" (flinging it back) and repeat on the second side.

Preparing to Drop Back
When preparing to drop back, it can be nice to work with ushtrasana (camel pose) variations—mainly because the ground is a little closer in this position! Let's start with the most familiar form of the pose:
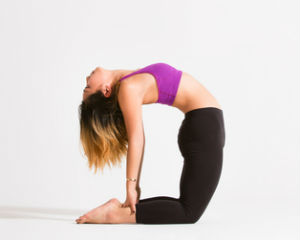
Ushtrasana (Camel Pose)
Start in a high kneeling position with your thighs parallel to each other and your hands on your hips. Either tuck your toes under or press the tops of your feet into the floor. Bring your thumbs to your sacrum and your hands around your hips. Draw your inner thighs back and press your pelvis forward (actions that are super-important in dropbacks!) Lift up out of your belly to lengthen your spine. As you move into the backbend, lead with your chest, and let your head follow. If reaching for your heels, reach both hands back simultaneously to avoid torquing your pelvis. When you're ready to come up out of the pose, just as you came into it, lead with your chest. Head comes up last.
Laghu Vajrasana (Little Thunderbolt Pose) with Bolster
From camel you can practice "dropping back" into little thunderbolt (honestly, is that not the cutest asana name ever?). To start, set up a bolster behind your feet. The exact distance from your feet depends on your torso length, and you may need to experiment a bit, but there will likely be a little bit of space between feet and bolster. Bring your hands around your hips, thumbs to your sacrum, and start to move into camel pose, only instead of bringing your hands to your heels, bring your hands to your inner thighs. Widen your thighs apart with your hands as you press your pelvis forward, and continue to backbend. Keep these actions going as you walk your hands down your thighs toward the creases of your knees. Inner thighs back, pelvis forward, chest lifts, back of the head moves back to follow.
From here, start to lean back—only to the point that you know for certain you can press yourself back up (in other words, only lean back as far as you can control it). Play with leaning back and pressing up a few times (press pelvis and chest forward to come up; head is last!). Perhaps you lean back enough that the hair on top of your head, or even the head itself lightly touches the bolster (avoid dropping or collapsing the weight of your head onto the bolster). Then press back up. Eventually you might move the bolster out of the way and practice moving toward the floor—to where your hair or your head lightly touch your mat—all the while maintaining control so that you can press yourself back up.

Do a Few Ground-Up Urdhvas First
Before you drop back into your urdhva dhanurasana, first get familiar with moving into it from the floor up.
Lie on your back. Bend your knees and place your feet flat on the floor as you would for bridge pose. Place your hands alongside your ears with fingertips pointing toward your shoulders. Don't allow your elbows to splay open; instead, draw them in toward center, but not so much that you're squeezing your ears. Suck your elbows back toward your armpits so that your armpits get hollow.
On your next inhale, lift your hips, straighten your arms, and press up into the pose. Only release your head if your arms straighten completely. If you're feeling pretty good here, lift onto the balls of your feet and walk them a little closer toward your hands. Lower your heels with control (without letting them splay out!). Ground down through your legs and press your chest back through your arms toward the wall behind you.
To exit the pose, walk your feet forward if you've walked them back toward your hands. Avoid coming onto the crown of your head. Lower your chin to your chest and lower the back of your shoulders/upper back onto the mat first as you come down.

Dropbacks at the Wall
Stand in front of a wall (err on the side of being close to the wall to start) and stand with your feet hip-width apart or slightly wider (basically a stable, comfortable distance). Ground through your legs, move your inner thighs back and pelvis forward. Some people prefer to bring their hands to their thighs and manually widen them apart as they move into the pose (like laghu vajrasana); others prefer to bring the thumbs to the sacrum like in camel. See what feels best for you as you work with these actions: thighs back, pelvis forward.
Keep that as you lift your belly, lengthen your spine, and move into your backbend, leading with the chest, and moving the back of the head back to follow. If you feel steady (meaning you can breathe comfortably), bring your hands to your heart in anjali mudra (prayer). Then look back toward the wall behind you, extend your arms, and plant your palms on the wall. You can stay here for a few breaths and then press up (press your pelvis forward; lead with your chest; head is last), or you can play with walking your hands down the wall a few steps and then back up before you press back up to tadasana (you might discover that you need to move just a little further away from the wall in order to walk your hands down and up).

Eventually, you may be able to walk all the way down the wall into urdhva dhanurasana...and maybe even all the way back up again! (If walking up isn't happening for you, remember, you can always lower to the floor just like you would after pressing up into urdhva dhanurasana.)
"Hanging Gardens" (a.k.a. "Dropback Without Dropping Back")
The next step is to practice every part of the dropback in the center of the room...except for the actual dropping back part.
Stand at the top of your mat with your feet a comfortable distance apart. Ground through your legs, move your inner thighs back, and press your pelvis forward. Choose where you want your initial hand placement to be—thumbs at sacrum or hands at inner thighs—and begin to work into the backbend: lift up out of your pelvis, broaden your collarbones, move the back of your head back. If this feels like plenty, stay here. Otherwise bring your hands to your heart. Stay, or extend your arms up overhead. Enjoy a few breaths in this standing backbend. Press your pelvis forward, and lead with your heart to come up, hands back to prayer, head is last. Repeat two more times.


Dropping Back Into Wheel Pose!
Once you've worked the preps and feel grounded in your legs and confident in your backbends, you might find that the dropback doesn't seem quite so scary.
Here's how you complete the transition into urdhva dhanurasana:
Come into your dropback prep: hands to heart, then extended overhead. (While it might seem easier to reach your arms down along your sides to come into the backbend, it's much safer for your shoulders if you enter the pose from arms overhead.) Continue to work into the backbend (eventually you'll have to bend your knees), and when you get to the point where you can see the floor behind you, you're good to drop back, planting your palms on the floor!
To begin with, just lower down the way you normally would from wheel pose (tuck your chin, and come onto the floor). Eventually you can ask your teacher and then perhaps a competent friend to help you with pressing back up to standing. (It's a really good idea to have someone who knows what they're doing supporting your hips when you first start working with pressing back up since it's super-important that you feel grounded and secure).
The Magic Roll
As I mentioned earlier, my quads can feel pretty tight. And for the longest time, what kept me from dropping back wasn't lack of back-bendyness or (eventually) even fear, but the fact that I couldn't actually bend my knees in order to drop into urdhva (at least without turning out my toes)...that is, until I discovered the magic roll! Okay, really, it's just a rolled up sticky mat, but it was totally the key to making a dropback possible for me. If you find that your knees just don't wanna bend for a dropback, or that you have to turn out your toes to make the transition happen (a compensation that's really not so great for your back and pelvis in the long run), give it a try! (I recommend working with the roll with the dropback at the wall first so that you get really comfortable with it before trying a center-of-the-room dropback).
The setup is simple: You just stand with your heels on a rolled up sticky mat and proceed to your dropback from there. That's it. You might be surprised to find that this extra bit of heel elevation makes bending your knees and thus dropping back into urdhva possible! Over time, work with unrolling your sticky mat bit by bit so that the support under your heels gets smaller and smaller (but go back and add more if you get stuck again, or if you turn out your feet).


Counter Poses
Whew! Dropbacks can sure be exhilarating (even the preps are pretty energizing)! Whether you made it to urdhva or not, it's a smart idea to counter all of the backbendy work that you did gradually instead of, say, flopping right into shavasana after your final heart-opener. Even skipping right to forward bends or twists is a lot to ask of your spine at this point. Instead, start to cool down with a pose that allows for a more neutral spine (some teachers refer to these as "extensions"). And because wheel is a pretty big quad stretch, an asana that stretches your hamstrings (the opposing muscle group) can be especially lovely after! An ardha parshvakonasana (half pyramid pose), or ardha hanumanasana (half splits or a "runners stretch") are nice choices—or even a full hanumanasana if your hamstrings feel adequately prepared.

Next, go for a lateral (side stretch) like parivritta janu shirshasana (revolved head to knee pose), parivritta upavishtha konasana (revolved wide angle seated forward bend), or this parighasana (gate pose) variation, which is a slightly less intense lateral bend than the others.
Set up in a high kneeling position, and extend your right leg straight to the side with toes pointing to the right, foot flat on the floor. From here, reach your right hand back through your legs to catch hold of your left heel. Let the sole of your right foot lift up off of the floor, flexing the foot as you slide your heel to the right and sit your hips back on the floor. Extend your left arm up and over for a side bend. You might be able to catch hold of the pinky-toe side of your right foot (if not wrap a strap around your right foot and catch hold with your left hand). Be sure that you're side bending and not rounding forward. Enjoy a few breaths here, then inhale out of the side bend and slide back up to your starting position. Step your right knee in, extend your left leg out, and repeat on the opposite side.

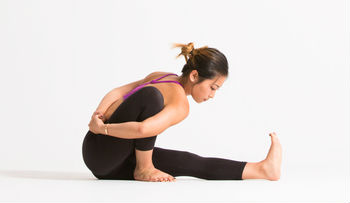
Next, continue to move toward stillness with a couple of gentle asymmetrical twists and forward bends like janu shirshasana (head to knee pose)—bonus! it's a twist and a forward bend—and marichyasana A (sage's pose A).
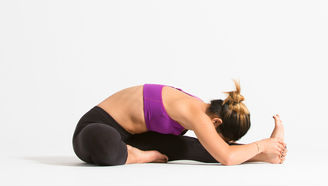
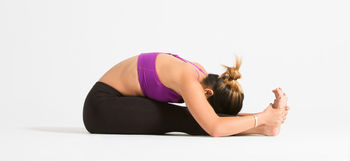
Finally, finish with several lavish breaths in your favorite symmetrical forward bend, like upavishtha konasana (wide-angle seated forward bend) or pashchimottanasana (seated forward bend).
Conclude your practice by settling into a cozy shavasana, resting and restoring after a challenging practice.
About the Teacher
Kat Heagberg (Rebar)
Hi, I’m Kat! I’m a teacher for Yoga International and co-author of Yoga Where You Are with Dianne Bondy... Read more
Trending Member Content
- Fascia forward yoga approach
- Tools to address imbalances
- Applied anatomy for posture