
Relieving Neck & Shoulder Tension
I enjoy being a student in other people’s yoga classes, especially those taught by master yoga teacher Angela Farmer. I was in one such class when I made a discovery. I was doing a traditional seated forward bend, legs extended, torso folded over thighs. My partner knelt behind me and applied gentle pressure to my lower back to help me lengthen my spine and go farther into the stretch. But I found if I arched my back just a little, pushed my spine into her hands (the opposite direction of the forward bend), held the resistance for a few seconds, relaxed, and then redid the posture, I could comfortably slide even farther and deeper into the pose.
In effect, I had tightened my muscle just before relaxing it for the stretch. I wondered if this concept could be applied to other yoga postures, helping me to get a better stretch. Over the years, I experimented in my own practice and found that these small moves could be effective in many other yoga poses.
Later I came across a technique called PNF, which stands for proprioceptive neuromuscular facilitation. Scientific research supports the PNF phenomenon, but Larry Payne (co-author of Yoga Rx) refers to it as the “yoga miracle.” It’s miraculous because the results are instant, painless, and amazing! It is widely used by athletes and trainers, and different variations exist, but the way I incorporate it into most yoga routines is unique. The basic technique involves alternating isometric muscle contraction and passive stretching. Before stretching a muscle, you tighten it and push against a fixed object—a partner, your own hand, a belt, the floor, or a wall. The subsequent stretch becomes longer, deeper, and far more comfortable than holding the limb in a static stretch.
For some years, I’ve adapted this way of stretching to my own mid-age body and for those who take classes from me. In the process, I’ve developed what I call the “three Rs”—Resist, Relax, and Restretch. The three Rs are a creative way to listen to your body and to gently increase your range of motion. I love seeing students’ amazement at the improvement in their own flexibility when they use the three Rs. While other yoga teachers mention the PNF phenomenon and occasionally tell their students about it, I’ve made it an integral part of the way I teach the poses—I call it a yin approach to stretching.
I’ve developed what I call the “three Rs”—Resist, Relax, and Restretch. The three Rs are a creative way to listen to your body and to gently increase your range of motion.
Let’s see how this approach works when it is incorporated into a series of simple exercises for releasing tension from the neck and shoulders.
The Neck and Shoulder Series
Our physical body is stressed and affected by many things: how we sit or stand, temperature changes, repetitive movements, what we eat and drink, and what we are thinking. It is typical of all of us to ignore our body’s discomforts until messages, which start as a whisper, become the cosmic bellow: “Hello? Anybody home?”
Think for a moment about where you feel stress and what words describe it: “knot in the gut,” “uptight,” “butterflies in the stomach,” “shouldering responsibilities,” “pain in the neck”—they all represent places on your body. The last two—the neck and shoulders—are a prime repository of stress. Neck muscles react strongly to stress and this tendency can be further aggravated by driving or by sitting at a desk all day. Many of us have the habit of guarding ourselves in stressful situations by tightening the muscles in our neck and shoulders in an unconscious attempt to brace against trauma, real or imagined.
I also carry a great deal of tension in my neck and shoulders. I love this exercise series and can feel improvement immediately every time I do it. These simple, effective moves can be done anytime, anywhere, such as during an hourly break from the computer, in the privacy of your office before a crucial meeting, when you get home after a long commute. The whole sequence takes only five minutes or so and is a great way to begin your day or as a preface to your meditation practice.
Keep the following guidelines in mind when using the three Rs, in this or any sequence of poses.
When you do the Resistance, do not push too hard. This is not a struggle. Remember to stay cool, calm, and focused.
Relax, the all-important second R. Let your whole body go limp. Feel it happen. And remember to exhale.
Hold the final Restretch position for the recommended number of breaths. If you hold longer, you will overdo the stretch, which can cause injuries.
Neck Tilt
I Benefits: Stretching the neck muscles has an immediate effect on your state of mind. Lengthening the larger muscles defuses stress held in the body and helps the whole body to relax. Lengthening and stretching small neck muscles will help quiet the mind and bring on a sense of well-being. This can also help prevent tension headaches.
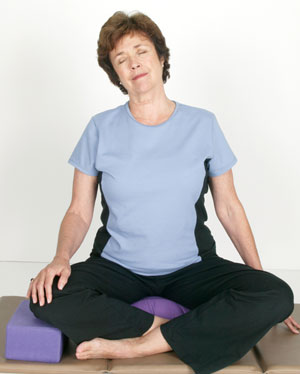

Sit tall with your shoulders down. Use props if needed, such as a block under the knee or a pillow to sit on. Tilt your head to the right side. Rather than bringing your ear to your shoulder, consciously extend and elongate your neck into the space to your right. The opposite shoulder and side of the neck will lengthen as well. Hold for 3 breaths. Repeat on the other side.
Now do the three Rs:
Resist. Reach your right hand up above your left ear. Use this hand as a little wall. Press your head gently into your hand, and your hand into your head. Resist for 3 breaths, without moving.
Relax. Stop pushing, relax, and breathe in. Exhale.
Restretch. Softly use your hand to guide your head a little farther into the space to the right. Lower your hand and hold for 2 or 3 breaths.
Repeat on the opposite side and observe which side is tighter.
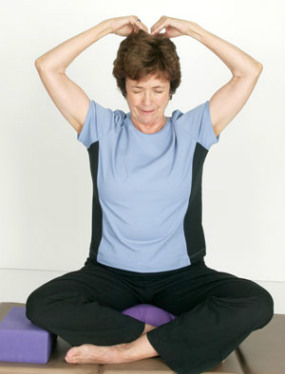
Chin to Chest
Yin tip: The neck is truly the body-mind connection. This delicate area is made weak and vulnerable due to poor posture, stress, and whiplash accidents. Here’s a tip: To create space within your chin-to-chest stretch, imagine you are holding a golden egg at throat level, then extend and gently lower your chin, holding the imaginary egg.
Sit tall and comfortably in a chair or on the floor with your legs folded. (If you’re on the floor, sit on a cushion to help your spine tip slightly forward.) Now slowly lower your chin, remembering the golden egg. Feel your neck muscles and the muscles between your shoulder lengthening. Rest in the stretch for 2 or 3 breaths, then lift your chin and return your head to neutral position.
Then, still sitting tall, drop your chin halfway to your chest. Reach up with your hands and place a few fingers on the highest part of your head.
Now do the three Rs:
Resist. Gently press your skull back into your fingers while your fingers gently press into your skull. Do not move your head during the resistance for 3 complete breaths.
Relax. Breathe in. Long, slow exhalation.
Restretch. Place your hands above your ears and support your head. Drop your head forward, chin moving closer to your chest. Feel the neck muscles lengthen as you hold the restretch for 2 or 3 breaths.
Return your head to neutral position. Sit quietly for a few moments, eyes closed. Enjoy the stillness.
Singing Snake
I call this Singing Snake because it can be used as a variation of Cobra Pose. After the Chin to Chest, there is a natural cue from within to go in the opposite direction, but many people find dropping the head back uncomfortable. The Singing Snake should be more comfortable. If you have neck problems or bone density issues, omit this exercise or do it cautiously.
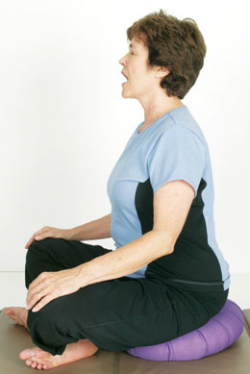
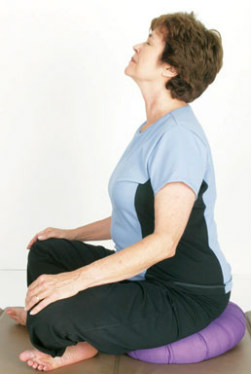
Sitting tall, breathe in with a slack jaw, and relax your body. Exhale. Then open your mouth as wide as possible. With your mouth open, slowly tilt your head back, then tilt your neck back as well. Relax your shoulders. This should feel more comfortable than if you had tipped your head back with your mouth closed.
Once your head is tilted all the way back, very slowly close your teeth and lips. When you close your teeth in this extended position, you are supported by the powerful clenching jaw muscles in the front of your neck.
Return your head to neutral position. Then slowly and enjoyably lower your chin to your chest to lengthen the muscles at the back of your neck and between your shoulder blades.
Chest Expander
Benefits: This sequence can be done standing, kneeling, or seated in a chair, with or without a partner. This stretch breaks up muscle tension and stress carried within the muscles of your torso. It improves posture and breathing. Take a time-out from the computer and do the Chest Expander on a coffee break. It energizes and clears the brain.

Begin by rolling each shoulder in both directions in slow circles—3 to 6 times each way for each shoulder. Then stand, your hands behind you, palms facing your seat muscles, clasping a belt. Separate your hands about four inches more if this bothers your elbows. Note that a partner can be helpful with this warm-up, as you can see me helping Kevin in the photo.
Standing tall, roll your shoulders back and down. Straighten your elbows, lifting your arms upward, holding on to your belt. Hold for 2 or 3 breaths, allowing your muscles to stretch. Release.
Now do the three Rs:
Resist by clasping the belt and gently pulling downward. Observe how this movement causes resistance and places tension on your upper back, shoulders, and arm muscles. Do not lift your arms at this point; just pull down… and hold the resistance, closing the gates of your shoulders.
Relax. Breathe in, long exhalation.
Restretch. Stand tall and again pull down.
Then, holding the belt, lift both arms up…maybe go a little higher…lift up your heart…breathe in…chest lifts…tailbone is down…keep “heart eyes” open as you exhale…hold for 2 or 3 breaths.
Lower your arms and release the belt…stand with your eyes closed…observe feelings of lightness in your arms and torso.
Yin tip: When you restretch, lift your arms up in increments, giving muscle fibers a chance to lengthen.
Ring the Gong
Benefits: The turning action gently stretches the torso and back.


Stand tall in Sacred Mountain Pose. Your arms hang down heavy and relaxed, and your weight is over both feet. Swing your arms from side to side, as if you were a child. Use your torso and shoulders to help you turn gently, and let your arms follow. Keep swinging, knees bent, from side to side. Repeat 6 to 8 times.
Pause. Now make your hands into two soft fists, like clappers in a bell. Repeat the first step for 15 seconds. Swing your arms around to “ring the gong” behind you, giving a little “ding” over each hip.
Shoulder Preparation for Garuda Arms
Benefits: Excellent for releasing tightness in front and back of shoulders. Nice warm-up for long-distance swimming, or your golf or tennis swing.

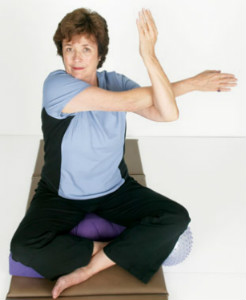

Sit comfortably on a chair or on the floor with your legs folded. (If you’re on the floor, place a cushion beneath your seat to lift your spine.) I also like to place a prop (a block or a ball) under each of my knees for support. Make sure you are comfortable and sitting up straight.
Extend your right arm out to the side, parallel to the floor. Then swing it gracefully across your body. Use the momentum to catch your right arm in the crook of your left elbow.
Holding on firmly, guide your right arm up toward throat level for a better stretch. Be sure your right arm is above your chest. “Measure” and feel the natural stop of the arm stretching. Hold for 3 or 4 breaths.
Now do the three Rs:
Resist with your arm at throat level, pressing the straight arm away from your body while you gently Resist with the crooked elbow. Hold the resistance for 2 breaths.
Relax…breathe in…exhale.
Restretch. Pull the arm very, very slowly across your throat…hold for 3 to 5 breaths. Notice how much farther your arm can stretch. To add a little heat, place your hand on the back of your neck.
Let the right arm go limp. Use the crook of the left elbow like a sling and slowly lower the limp right arm.
Then repeat the steps on the opposite arm.
Garuda Arms
{asset-12
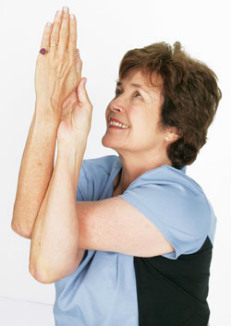
Extend your arms out from your sides in a T position. With a big swooping motion, cross your left elbow over your right elbow. Clasp your hands to your shoulders. Give yourself a big hug. Hold for 2 or 3 breaths. Smile! Enjoy giving yourself a hug today.
Now release your hands, keeping the elbows crossed. Place the backs of your hands together. If you are more flexible, put the thumb of your left hand into the palm of your right. Slowly raise both arms up and down.
Release your arms out from your sides to again form a T. Repeat the steps, crossing your right elbow over your left.
Adapted from Lilias! Yoga Gets Better with Age, by Lilias Folan. Printed with permission from Rodale, copyright ©2005 by Lilias Folan.