
5 More Ways to Use Props
I love props. I love practicing and teaching with them. They are fantastic tools that offer endlessly creative ways for finding more space, freedom, and stability in your poses. When used skillfully, they can help students understand alignment instructions and experience a pose's key actions, deepening their embodiment of that pose.
Once you enter the world of props (especially within the Iyengar yoga tradition) you’ll discover myriad ways to employ them—from supporting complete relaxation in restorative postures to significantly increasing the challenge of some poses.
Below are a handful of playful ways to use props. These are (sometimes unconventional) variations that I’ve picked up from various teachers along the way. Give them a try, and see what you think. You might just find a new favorite way to incorporate props into your practice!
Lift Your Toes in Camel Pose
Lengthen your spine and free your low back in camel pose by propping up your toes on a pair of blocks.
Place two blocks on your mat, on the lowest height and parallel to the front edge, and with the narrow ends together. Come to stand on your knees (hip-width apart), with your feet on the blocks and your toes curled under. With your hands on your hips, hug your knees energetically toward each other, reaching your tailbone down and lengthening your torso. Broaden your collarbones, and lift your sternum forward and up. Keeping the sides of your body long and your chest lifted, reach your hands to your heels. Root down through your knees and press your hands down into your heels to lift and broaden your chest, lengthening your spine by creating space between your rib cage and your pelvis. With your chest lifted, keep all sides of your neck long as you begin to take your head back and gaze up (if that is at all uncomfortable, you can lightly tuck your chin toward your sternum).

Although camel pose is by far the least forgiving backbend for my low back, this variation feels great throughout my entire spine. With the heels elevated, not only is the backbend not as deep, but having the feet above the knees (angling the shins) shifts the weight more into the knees—making it easier to press the hips forward and keep the thighs vertical. (You may find it feels most comfortable to practice this variation with a folded blanket under your knees for extra padding.)
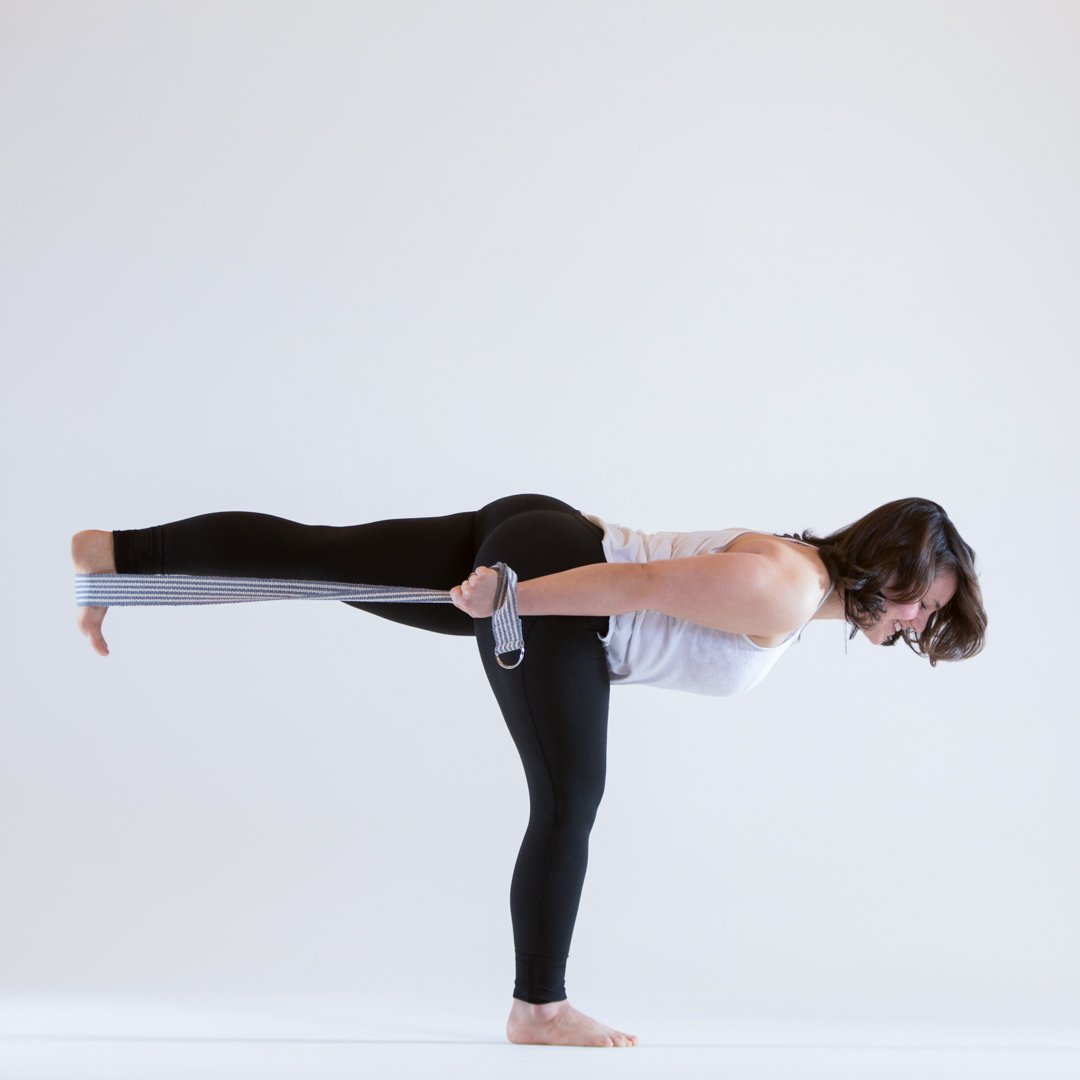
Strap in and Take Flight in Warrior III
Find more stability and freedom in virabhadrasana III (warrior III) by using a strap for support.
With one end of a strap in each of your hands, stand in tadasana (mountain pose), with the length of the strap resting on the floor behind your heels. Step back onto the center of the strap with your left heel. There should be a decent amount of tension on the strap, so adjust your grip as needed. Inhale, root down through both feet, lengthening your spine and lifting up through your sternum. Exhale, broaden your collarbones, stabilizing your shoulder blades onto your upper back. Continue pressing your left heel into the strap and pulling in the opposite direction with your hands, lengthening the sides of your body; slowly begin to tilt your torso forward and lift your left leg back and up into virabhadrasana III with your arms alongside your torso.
Play with pressing through both heels and extending through the crown of your head as you feel yourself “fly.” Remember to draw your low belly in and up for support. You may find that the dynamic action of pushing back through the lifted heel while also pulling forward with the hands feels incredibly solid—allowing you to work on stabilizing your core while lengthening evenly through your spine. When ready, slowly lower your lifted leg back down to the floor, step off the strap, and repeat on the other side.
Dig Deeper in Low Lunge
For a deeper thigh stretch in a low lunge, try placing a block under your back knee.
Begin in a lunge position with your right foot forward; your back knee is raised off the floor, hands are on the floor, and a block (at its lowest setting) is on the mat underneath your back knee. Slowly lower your left knee to the block, behind your left hip (so that your thighbone is not vertical). Bring your hands up onto your front thigh, and lift your torso upright. Kick your left foot up, and reach back to hold the big-toe side of your left foot with your left hand. Slowly bring the inner edge of your back foot toward the outer edge of your left hip. With your chest lifted, bend your front knee deeper. When you’re ready, slowly lower your left foot back to the floor, and repeat on the other side.
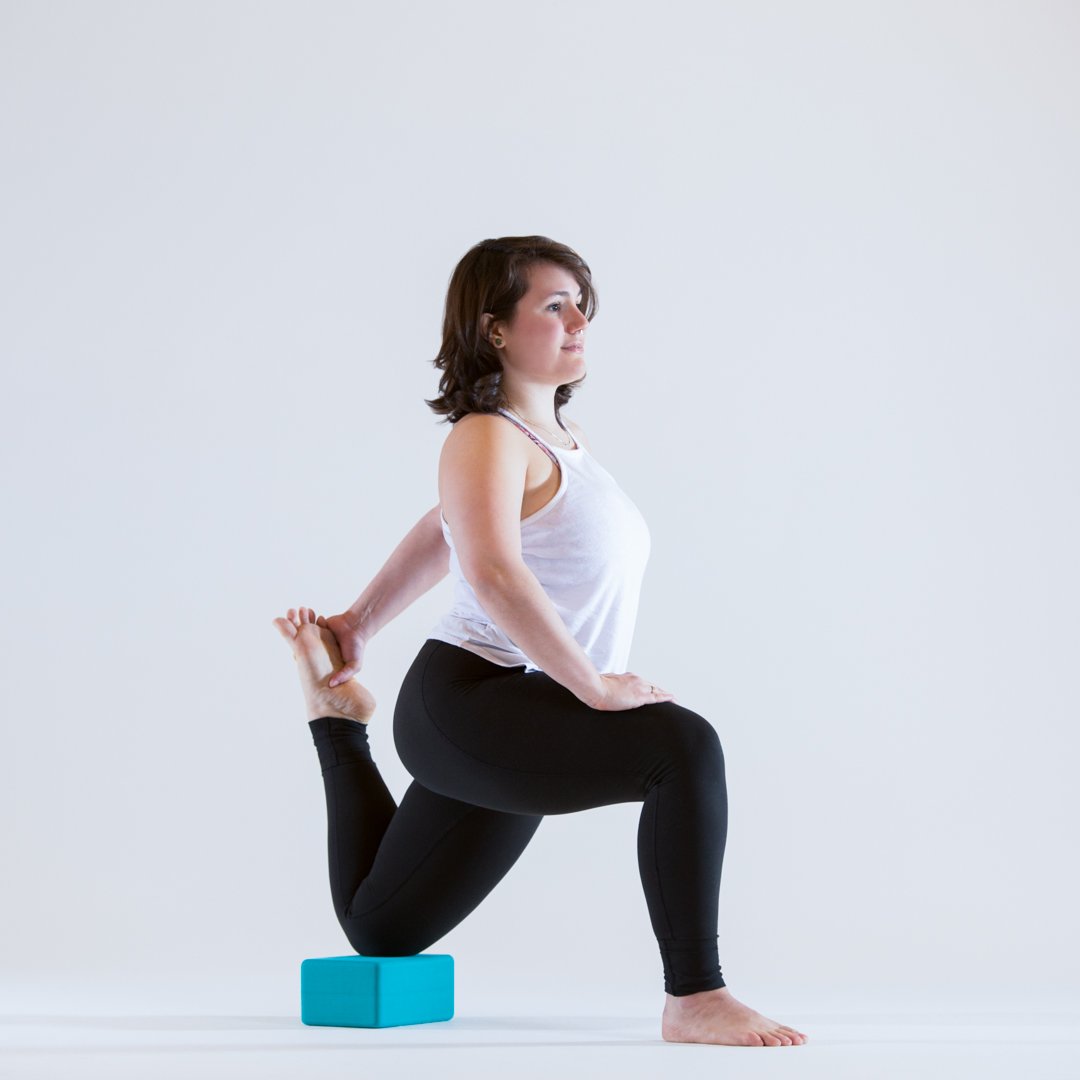
Placing a block under the back knee invites the pelvis to stay lifted (as opposed to releasing all of your weight down into the hips, which risks reducing muscle engagement of the legs and core, making it difficult to lift and lengthen the spine—and consequently leading to crunching in the low back). Placing the block on the thigh just above the kneecap (rather than directly under the kneecap) facilitates a deeper thigh stretch (and may also feel a little more comfortable for your knee!).
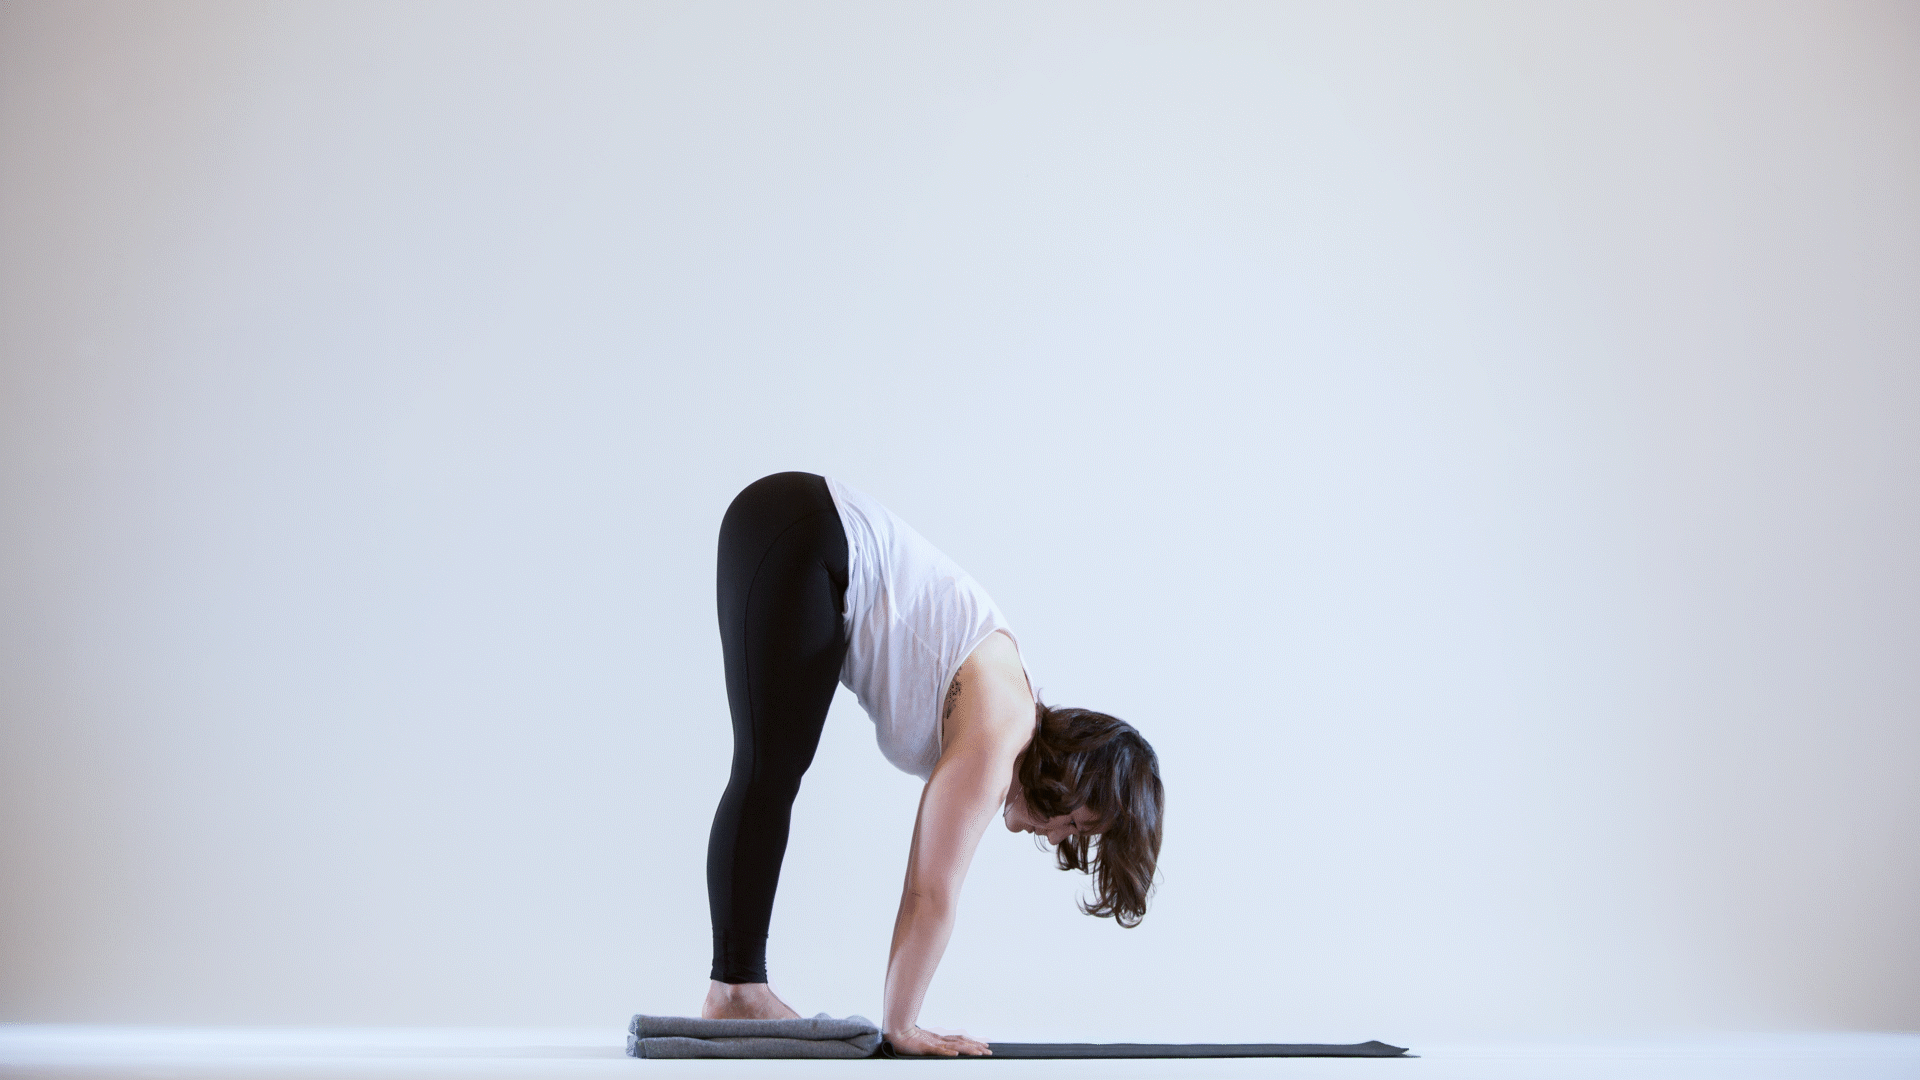
Uplift Your Down Dog
Placing your hands on blocks in downward facing dog pose can help you to maintain a lift through the underside of your arms and your shoulders. You may find that this creates more stability and allows you to find more length through your spine.
Place two blocks lengthwise (at the lowest height) at the front of your mat. From all fours, place your hands on the blocks with fingers spread, and press back into down dog (feel free to take a shorter down dog and to experiment with keeping your knees bent). Lightly gripping the blocks with your fingertips, press down through the pads of your fingers and palms (thumbs can wrap around the block), and extend out through your arms. Lift the underside of your arms and shoulders away from the floor. Broaden your collarbones, and soften the muscles down the nape of your neck. Resist dropping your armpits toward the floor as you press the tops of your thighs back, lengthening your spine.

With your hands on the blocks, you can try stepping forward from down dog into a lunge, and see if you’re able to find a little more room to make that transition. (The extra height you gain from having your hands on the blocks may also help you to move more smoothly through plank to chaturanga to upward facing dog if you felt like taking a vinyasa or two.)

Blanket Work to Strengthen Your Core
Tap into your inner core for liftoff by using this nifty blanket trick for half of a sun salutation.
You’ll want to be on a hard, smooth surface for this exercise. Fold your mat in half, and place your folded blanket (in the shape of a large square) on the floor directly behind the mat (with the edge of the blanket touching the edge of the mat).
Stand in tadasana with both feet on the blanket. On an inhale, reach your arms overhead; exhale and reach your arms out to your sides as you fold forward, bending your knees as necessary to place your hands on the mat. Inhale, and with your fingertips still down on the mat, lift halfway up, lengthening your front body forward into ardha uttanasana (half forward bend); exhale and press down through your palms and slide your feet back, coming into a plank position. Take an inhale in plank, and on an exhale, lift through the sides of your waist, draw in and up through your low core, and slide the blanket back up to the mat in a jackknife position. On your next inhale, lift up halfway once again, lengthening your front body forward; exhale and shoot your legs back into a plank.
Repeat four or five times, and if you’re up for it add a chaturanga push-up to your planks.
This exercise is phenomenal core work. It also allows you to practice the necessary actions for successfully jumping forward and back in your sun salutations, as well as preparing to lift into arm balances. In fact, you can even practice coming into crow pose, bringing your knees to the backs of your upper arms, and even lifting your feet up as you pull the blanket back to the mat!